December 5, 2011

Eggnog French Toast

"A photo is worth a thousands words."  That's how I feel about the photos of my eggnog french toast below.    As in, my mouth is watering just looking at it, remembering the eggy, sweet soft bread drizzled with real maple syrup and melted butter for just that touch of creaminess.  In fact, I was going to write an entire entry discussing how french toast is just like bread pudding, but faster.  And how odd it is that we consider bread pudding dessert, when it's the same exact ingredients as french toast, which is for breakfast.  But that someone must actually consider bread pudding a breakfast food also because they serve it in the cafeteria for breakfast where I work.  I'm not going to do that though.  Just look at the pretty pictures.

Eggnog French Toast
Eggnog French Toast Eggnog French ToastEggnog French Toast

Really, it's just like the bread pudding, but faster.

Eggnog French Toast for (a really gluttonous) One

3 slices of soft Portugeuse sweet bread, or brioche, torn in half if cut wide
1 egg
1/2 cup of light eggnog (because we like to pretend we're making this healthy)
Dash of cinnamon
Butter, unsalted (for pan and to top toast if desired)
Maple Syrup

1. Whisk together egg, eggnog and cinnamon until frothy.
2. Dunk halfs of bread into the eggy mixture until coated on both sides and let sit for approximately 15-20 seconds until its soaked through but still firm
3. Place soaked bread slices onto medium-hot skillet with a touch of butter in the bottom, and flip until cooked through and golden.
4. Top with a bit of butter and maple syrup.
5. Die of pleasure.

December 1, 2011

Eggnog Bread Pudding

Eggnog Bread Pudding

This has been a comfort food kind of week for me.  Or rather, after feeling a bit sick to my stomach the first half of the week and not eating, I was ready to have a yummy treat that would both settle my tummy and provide a big warm and fuzzy hug.  And you know what kind of food does that the best?  Bread pudding.

When I bought the day old bread for the bread pudding, I had visions of a spicy pumpkin souffle in mind.  But last night when I realized that the only liquid dairy product in my kitchen was eggnog, plans had to change.  I had to get in the Christmas spirit and let go of the squashy autumn flavors.

Unfortunately, I didn't accept this change to my (complete lack of) recipe until after I had photographed the ingredients.  Thus no ingredient snapshot.  But I did my best to capture some of the vitals add-ins after the fact.  Next time I think that I might toss in dried (or fresh?) cranberries as opposed to raisins and apples, along with a stronger hint of nutmeg.
Eggnog Bread PuddingEggnog Bread Pudding

The great part about this recipe is that the eggnog and whiskey is already sweetened, so there is no need to add sugar into the mix.  The raisins and apple also add a bit of sweet, fruity flavor in each bite.  I'm very pleased with the portions in this recipe also.  Often times my bread will be a bit too stale, or I won't use enough liquid in the mix, or a bit too much egg so that it almost quiche-ifies (my word!).  So proportionally, I was very pleased with how this came out.  Everything came together in a soft, but thoroughly cooked treat.

Ingredients

1/2 loaf of Portugeuse bread, torn into bite-size pieces
3 large eggs
1 cup of light eggnog
1/2 cup of American Honey
1/2 cup golden raisins
1 apple, diced into 1/2" cubes
1 tablespoon unsalted butter, diced

Directions

1. Preheat the oven to 375F.

2. Whisk together eggs, eggnog and whiskey in a small bowl.
Eggnog Bread Pudding

3. Toss together bread, raisins and apple and when mixed place into a medium-sized (8-9" diameter) baking pan.
Eggnog Bread Pudding

4. Pour the eggnog mixture over the dry ingredients in the baking pan, using a large spatula to fold it in and coat all of the bread.

5. Evenly sprinkle the diced butter over the top of the bread pudding and place in the oven.
Eggnog Bread Pudding

6. Bake for approximately 30 minutes or until a knife or cake tester draws clean.  Remove from the oven and allow to cool. Best served warm with a dollop of ice cream!

Eggnog Bread Pudding Eggnog Bread Pudding

November 22, 2011

Mini Pumpkin Whoopie Pies with Maple Filling

pwp_finalproduct
Mini Pumpkin Whoopie Pies with Maple Cream Cheese Filling

A recipe arrived in my inbox on Friday that could only make magic with that one last pumpkin perched on my counter.  My favorite newsletters/blog from thekitchn.com was highlighting the joys of Thanksgiving treats, namely pumpkin-derived treats.  And standing out in their collage of autumnal food porn was the Mini Pumpkin Whoopie Pie from Brown Eyed Baker.  It was destiny.

Now I'm including the recipe below because I made some modifications - as usual.  So what happened?  Well, the first problem was that I ignored the keyword "chilled" in front of "pumpkin puree".  I literally steamed my pumpkin, pureed and dumped it directly in with the wet ingredients.  The sugar melted from its fluffy state and became an egg-sugar-pumpkin soup.  There was really no recovery from its liquid state, so I tossed in the dry ingredients to see how bad the damage was.  It was bad.  It was like cake batter, not cookie dough.

pwp_wetbatter
Melted sugar-egg-pumpkin batter
Lesson:  Don't be so impatient! Cook and chill pumpkin before starting the recipe.

So if, in spite of my warnings, you do this anyway, this was my solution:  Add another egg.  Add another cup of flour.  Add 1/4 cup of sugar.  So the recipe below is the Oops! recipe.  I did test out some of the liquid batter to see how it baked compared to the Oops batter, and I saw little difference, honestly.  The added egg/flour only managed to fluff it up by a mere 1-2mm.  No where near the fluffiness of the ones on the BEB blog.  The flavor was not compromised.

pwp_pumpkinpwp_batterpwp_finalbatter

You'll also note that I halved the filling.  I seriously had 1/2 bowl left from the original recipe, so unless you want to get diabetes in one sitting or toss out half your food stuffs, stick with the recipe below.  I also felt that the tart cream cheese heavily overwhelmed the maple syrup, so I kicked the maple up a notch.


pwp_frosting2
Maple cream cheese filling whipped up in the KitchenAid


Pumpkin Whoopie Pie Dough:

4 cups all-purpose flour
2 tablespoons cinnamon
1 teaspoon baking powder
1 teaspoon baking soda
1 teaspoon salt
1 teaspoon ground ginger
1/2 teaspoon ground nutmeg
1 cup granulated sugar
1 1/4 cup light brown sugar
1 cup vegetable oil
3 cups chilled pumpkin puree
3 eggs
1 teaspoon vanilla extract

Maple-Cream Cheese Filling

1.5 cups powdered sugar
4 ounces cream cheese, at room temperature
2 ounces (1/2 stick) unsalted butter, at room temperature
5 tablespoons maple syrup
1 teaspoon vanilla extract


1. Preheat oven to 350F. Line baking sheets with parchment paper.  You can brush and flip the parchment to cycle through, since I ended up putting 6 professional-sized baking sheets-worth of cookies inside and ran out of parchment.

2. In a medium bowl, whisk together the flour, cinnamon, baking powder, baking soda, salt, ginger and nutmeg. Set aside.

3. In your mixer with the whisk attachment, whip the granulated sugar, dark brown sugar, and oil together. Next add the pumpkin puree (when its chilled!), eggs and vanilla.

4. Lastly, gradually add the flour mixture to the pumpkin mixture.  You may want the shield on your mixer bowl since it tends to splash up a lot of flour in the process of mixing.

5. Use a small cookie scoop to deposit mounds of dough on the prepared baking sheets, about 1 inch apart.

6. Bake for 10 to 12 minutes.  They'll puff up a bit and look a little golden on the edges.  If you lift the underside of a cookie, it will be just beginning to color.  You may want to test a cookie at this point also, just to make sure it's baked thoroughly.

Now I brought these puppies into work, since that's where I pawn off all my treats before I gluttonously eat themself.  Best response yet!  Here is a selection of the e-mails and verbal comments I was made!

"I went home last night feeling so terrible because I didn't tell you how amazing the whoopie pies were!"  "Me too!  I meant to e-mail you and felt so bad that I didn't give you feedback!" - Meridith + Dov
"You should seriously consider opening your own bakery. They are delicious. Thanks for sharing." -David
"Your pastries were SO delicious yesterday." - Chris (and I don't think he was just sucking up to me because I'm his new boss)
"I went back for seconds but... they were all gone!" and holds up the empty tupperware container with a sad look. - Mitchell


November 6, 2011

Pumpkin Mac and Cheese

Pumpkin Mac and Cheese

I'm completely serious when I tell you that I still have those sugar pumpkins in my kitchen just waiting for me to make use of them.  And now that I'm no longer eating vegan (did I mention this?  I started November as a regular vegetarian again), it was clear that I had to indulge in the most decadant of dairy comfort foods: macaroni and cheese.

But what about pumpkin macaroni and cheese?  It's been done.  It's been in Gourmet, Better Homes and Gardens, the Food Network, a million food blogs, but not by me!  And surely that's a massive oversight.  I love pumpkin.  I love cheese.  Marrying the two together in a creamy, spicy autumn dish sounds like just the ticket to heaven.

And fat thighs.

So rather than try to make this dish healthy (because really, can you?  I think not), I just dropped down the serving size to reduce the temptation to overindulge.  This is a two serving recipe that you should be able to double if you're serving more than one or two.

Some notes on the recipe before we get started.  I only had vanilla soy milk in the house, so where I would normally use milk in the cheese sauce, I ended up using plain greek yogurt. I'm quite pleased with the results and will likely continue to use it in the future. I also only happened to have Four Cheese Mexican shredded, which I'd hesitate to use as my cheese base - opting for an American or Gruyere, something super melty, but this actually turned out fairly well once creamed with the yogurt and butter.

Now I left the house while roasting my pumpkin and remember, in a panic, two hours later that it was in the oven.  My pumpkin was a bit brown on the skin and the underside blackened on the surface, but the great part is that the skin peeled off instantly, as did the crusty edge, leaving a rich, flavorful well-roasted pumpkin interior.  Lesson learned: None.  Without proper ramifications, I will continue my spree of nearly burning down the house via the oven/stove.

 My last note is that I love adding a spicy kick to pretty much every savory dish.  My most frequently used spice is cayenne pepper.  Add this, or not.  I put it in both the cheese sauce and the crumb topping.  I highly recommend including, but I do recognize that cayenne in every single dish isn't for everyone.  I'm thinking next time that I might toss in some chipotle in adobo sauce to kick things up a notch as well. 

Pumpkin Macaroni and Cheese

3/4 cup of roasted sugar pumpkin
1 cup of Ezekial 4:9 rotini (or other pasta)
1 cup of shredded cheese (use what you have or love)
2 Tbsp of plain greek yogurt
1 Tbsp salted butter
2 garlic cloves, pressed
1-2 tsp cayenne pepper
1/2 Tbsp of butter, diced
1/4 cup of whole wheat breadcrumbs

Pre-heat oven to 400F.

The first step is roasting the pumpkin.  I pretty much exclusively roast vegetables.  It is a slow cook method that caramelizes and brings out the richest flavors.  To do this I halved the sugar pumpkin, chopped off the stem, cleared out the seeds and lay it face down on an olive oil-greased pan. Place it in the oven until the flesh is tender, the edge caramelized (or go shopping and leave it in the oven for two hours until it's burnt and just scrape off the toasty parts).

Pumpkin Mac and CheesePumpkin Mac and Cheese

The next step is cooking up the pasta.  I exclusively eat Ezekial 4:9 pastas, which are rich and dimensional in flavor with high protein content and wide nutritional profile.  This pasta cooks a bit quicker than your average pasta, so if you go with it, make sure to test for readiness after 6 minutes or so.  Once done, drain and set aside.

Pumpkin Mac and CheesePumpkin Mac and Cheese

The cream sauce is quick and easy.  In a saucepan, toss in your garlic along with the cheese, butter and yogurt.  Cook on low and constantly stir until creamy.  Add pumpkin.  Once combined, toss in any spices just as you take it off the stove.

Pumpkin Mac and Cheese


Fold sauce into the pasta.  Top with a combination of bread crumbs, salt and spice.  Then pop into the oven until the top is a golden brown and the sides are bubbling.  Eat.

Pumpkin Mac and CheesePumpkin Mac and Cheese

Bonus:  Toasted Pumpkin Seeds

Using up all the parts, I threw my pumpkin seeds in the oven with some olive oil, salt and chilli powder.  I totally do not recommend using any oil.  I don't know why I did.  The wet pumpkin guts are enough to stick the seasoning to the seeds.

Pumpkin Seeds Pumpkin Seeds
One sugar pumpkin down!  One last pumpkin to go.

November 1, 2011

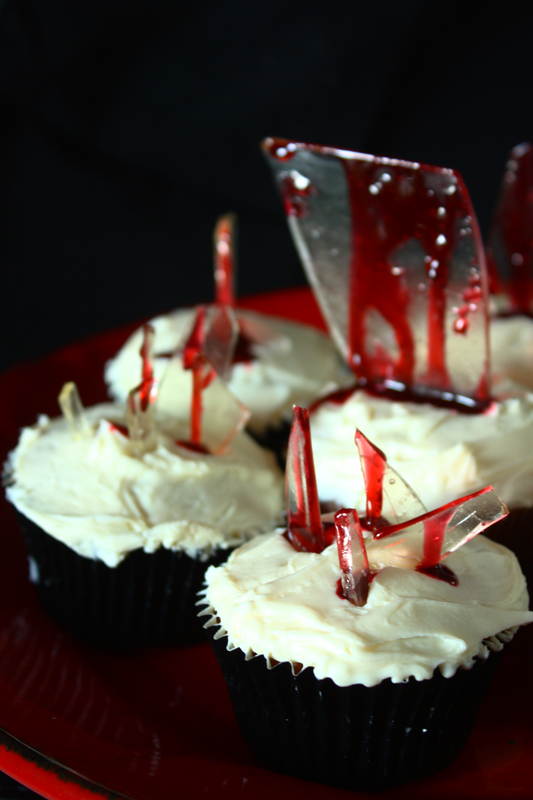
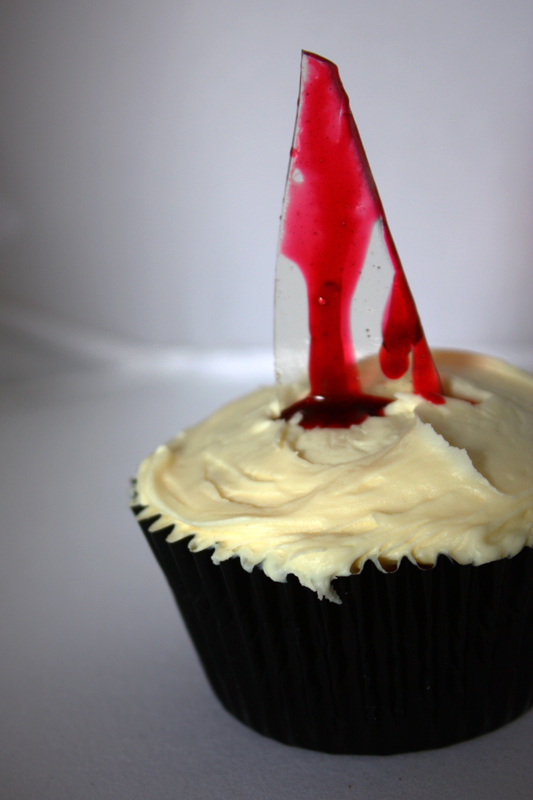
Bloody Broken Glass Cupcakes


Bloody Shattered Glass Cupcake
Bloody Broken Glass Cupcake

Halloween is my favorite holiday of all time.  I actually think that it should be a national holiday that gives people that day off from work.  That way we can spend our day putting on costumes and hosting lengthy themed parties.  Parents will easily be able to take their kids trick or treating mid-day rather than rush home after work.  We get time off for religious observances, right?  Can Halloween be my religion?

This year I decided that I was stepping my Halloween cupcakes up a notch.  I always stick with cupcakes, since they're easy to grab at parties.  There can be individuality to each cupcake as well.  Usually I do frosting-and-candy based monsters and creepy creatures.  But this year, I came across a pin on pinterest that took my breath away.  Bloody shattered glass stabbing into a perfectly pristine white cupcake.  Gruesome.

Not only do they look impressive, but easy on an effort scale.  I mean, individual monsters actually cost me more time than bringing sugar to the hard crack stage, and whipping up a batch of syrupy blood.

I consulted multiple sources for the concoction of realistic looking blood and the easiest, clearest sugar glass recipe.  In the end, I adapted a Martha sugar glass recipe for similar cupcakes and followed a great tutorial on edible fake blood from the Clockwork Lemon blog.

Bloody Broken Glass Cupcakes  
Bloody Broken Glass Cupcakes

Classic buttercream topped vanilla cupcakes

This is all up to you. Homemade, box, whatever. Just put together your classic white cupcakes. White so that the blood shows in stark contrast. I also recommend picking up some black cupcake liners, or thick premium white liners. The regular store bought white liners tend to discolor with the cupcake.

Bloody Broken Glass Cupcakes

Sugar Glass
1 cup sugar
3/4 cup water
1/4 cup corn syrup

For the sugar glass, combine all of the ingredients in a saucepan set to medium-high and clip your candy thermometer onto the side. Bring the mixture to a boil, drop the stove temperature down to medium and simply stir. And stir. And stir. Seriously, stir for like 45 minutes until the water evaporates off and your thermometer reaches 350F. Once your sugar reaches temperature, remove it immediately from the heat and pour it in a thin layer into a greased baking metal baking pan. I used butter to grease mine with, which was a poor plan. It turns your glass yellowish. So make sure to use something clear like shortening to avoid yellow swirls and cloudiness in your sugar glass. Allow to set until hard. Twist the pan to pop out the sugar glass and crack as desired.

Edible Fake Blood
1/4 cup corn syrup
Wiltons no-taste red gel dye
Wiltons black gel dye
Hot cocoa powder

Bloody Broken Glass Cupcakes


You don't really need much of this, so my recipe creates only a small amount of this fake blood. I found that the Wilton gel dyes created a much stronger color. Make sure to mix the dyes and syrup in Pyrex or other glass because it will otherwise stain plastics. I used the tiniest dot of black (it goes a looooong way) and quite a bit of red. Experiment. You can use the cocoa powder to create opacity in the blood. Just make sure to mix well so that it doesn't look gritty.

The final product can be styled in a most gruesome fashion to wow all of your friends and coworkers!

Bloody Broken Glass Cupcakes Bloody Broken Glass Cupcakes Bloody Broken Glass Cupcakes

October 24, 2011

Pumpkin Cookies with Maple Glaze

One of my pumpkins from the overzealous pumpkin-buying spree.

I recently bought four sugar pumpkins.  Whole Foods was having this 2/$3 sale that I couldn't resist.  They're so round, so orange and embody everything that makes autumn delicious.  But yeah, I really don't need four.  I don't even have room to cook down and freeze them.  I should have known this.  I see a lot of pumpkin-carving on the menu this week.  Or like three weeks worth of pumpkin-based meals.  No kidding.

Now in spite of having pumpkins at my disposal, that whole roasting and blending process is a daunting prospect after a busy work week.  So I'll admit, I cheated.  Okay, it wasn't really cheating.  Not only do I apparently hoard over-buy sugar pumpkins, I also have a cabinet full of canned pumpkin (and coconut milk, coincidentally).  That means that I was actually doing my cabinet a favor when I cracked open a can when I felt compelled to make cookies last night.

I really just wanted some nice chocolate-chip cookies, but I had no chocolate.  I was also exhausted and coming off having a rough afternoon, so the idea of moving any greater distance (such as to the grocery store) than 5 feet from one side of my kitchen counter to the other was basically a pipe dream.  Thus I looked over what was in my cabinets and what was on the internet for veganized cookie recipes and landed on Pumpkin Cookies!

I love pumpkin cookies.  I actually have an amazing Martha Stewart recipe that I whip up every Christmas that uses a brown-butter glaze.  They're insane.  But if the "brown butter" didn't clue you in, they're so not vegan.  I have, however, started to get used to the tricks of the trade - how to get around basic baking ingredients like eggs (flaxseed + warm water), butter (oil or vegan butter), and milk (soymilk really is okay to use most of the time).  In fact, the most exciting trick of all is making whipped cream from the thick custardy top on canned coconut milk.  Mmm. But I digress.

The super soft, total-wouldn't-know-they-were-vegan pumpkin cookies:

Vegan Pumpkin Cookies with Maple Glaze


Pumpkin Cookies with Maple Glaze
adapted from food.com

Cookies:

2 cups all-purpose flour
1/2 cup whole wheat flour
1 teaspoon baking soda
1 teaspoon baking powder
1 teaspoon ground cinnamon
1/2 teaspoon ground nutmeg
1/4 teaspoon ground ginger
1/8 teaspoon ground cloves
1/2 teaspoon salt
1 cup granulated sugar
1/2 cup brown sugar
1/2 cup Earth Balance
1 can pumpkin
1 teaspoon vanilla extract
2 tablespoons flaxseed in 4 tablespoons of warm water, whisked

Glaze:
1 cup powdered sugar
2 tablespoons of real maple syrup
1 tablespoon soymilk
1 tablespoon Earth Balance
1 teaspoon vanilla extract

Preheat the oven to 350F.  Grease your baking sheets.  I use coconut oil to grease mine!

Now I'm notoriously bad about my mixing methods when it comes to cookies.  It's a little different if the baked good has more temperature sensitivity, but cookies?  Not so much.  I just toss everything into the bowl at once and then let KitchenAid do the magic.  If I were mixing by hand?  Well, then I might do a dry-only bowl and a wet-only bowl, mixing at the end.  But I don't because I am convinced that my KitchenAid can fix anything from lumpy custard to lung cancer.  So my instructions are like this:  Put all of those cookie ingredients into the bowl and mix until whipped smooth.

For soft fluffy cookies, especially where I don't use traditional levening ingredients, I like to chill my dough.  So once you've mixed up the dough, pop it into the fridge for a half hour to stiffen up.  Then use a small melon baller to pop out bite-sized cookies on your sheet.

The cookies take anywhere from 12-15 minutes to bake.  They'll be tender and soft, so do a bottom check to see when they're a soft golden.  Even if they're a bit soft on the inside, they'll continue to cook on a rack while they cook down.  This recipe made me about 45-50 bite-sized cookies.

Once your cookies have reached room temperature, it's time to make the glaze.  Since I don't own a microwave, I melted my butter in my stove-top butter warmer.  After it melted down, but wasn't bubbling just yet, I removed it from the heat and added the wet ingredients.  Using a whisk, I blended the soymilk, maple syrup, vanilla and butter until smooth, then began sifting in the powdered sugar.  The amount of sugar you use is both a matter of taste and consisency.  I found that 1/2-1 cup was plenty and that I only ended up drizzling 1/4 of it onto the cookies.  Less is more with this glaze, so feel free to halve this recipe.

The glazing process: butter warmer + maple syrup = delicious.


I was bringing these puppies to work within a half hour of drizzling, so I tossed them into the fridge for a quick glaze-hardening chill. And that, ladies and gentleman, is your bit of autumn baking spirit!

October 12, 2011

Fresh Avocado Vinaigrette Dressing

I discovered something incredible yesterday. So incredible that I had the salad bar from Whole Foods not just for lunch, but for dinner too. It wasn't the fresh greens, creative flavorful side salads or heavily sauced seiten. It was a new salad dressing.

Cindy's Kitchen has come out with another mind-blowing dressing to top your salad: Fresh Avocado Vinaigrette Dressing

It's smooth, fresh, but with a zing of heat and spice that makes you want to drink the entire bottle rather than slather your lettuce in it. It's almost like a more fluid, smoky, spicy guacamole. The ingredients explain why: Filtered water, avocados, salsa verde (roasted tomatillos, water, fire roasted chile peppers, fire roasted onions, salt, garlic, spices), organic sunflower oil, white balsamic vinegar, can sugar, lime juice concentrate, garlic puree, sea salt, extra virgin olive oil, matcha green tea and green tea extract. 

If anyone can tell me why they add green tea, I'd love to know. To claim an antioxidant boost? As the last ingredient, I can't imagine that it packs even a subtle shift in the flavor. If you haven't tried this dressing yet, I insist that you run out immediately. I grabbed a full bottle from the produce section to take home, along with some other salad-making ingredients. There is no way that this isn't going to be hitting my plate on a nightly basis from here until all 16 oz are gone.

For a peek at the bottle as well as another ringing endorsement, check out another Boston blogger who also raves about the new fave: Mise en place

I will be updating with photos this evening (who likes a post without visual enhancement, right?)!
Related Posts Plugin for WordPress, Blogger...