Showing posts with label cake. Show all posts

February 28, 2012

Banana Ice Cream Cone Cupcakes with Cream Cheese Frosting


Banana Cone Cupcakes Another birthday, another "cake" to make.  I was given free reign this time around.  I wanted fruit to be involved, but I had limited time and couldn't whip up the mousse cake I would have preferred.  So instead, I went for creativity over complexity.  Or at least that's what I thought.

So I found the how-to on cupcake cones at the blog House of Hepworths.  She describes this fantastic holder cut from a foil pan, which appeals to my crafty senses.  Well, I might have gone a bit overboard.  I bought a deep roasting pan, since the cake takes like 90 minutes to cook through (it's a sloooooow cake recipe) and therefore I didn't have three hours to spare by the time I rolled home at 10pm (That's right, I got suckered into post-work drinks and forgot about my ambitious cake-making plans).

Well, let me warn you:  Do not use a roasting pan to get 18 holes in for your cones.  The cones don't rest on the cookie sheet below and the pan is left to support their weight.  It will sink in the middle as it heats up.  The batter will spill out into the great big lake of batter in the middle of your aluminum holders.  The cheap ice cream cones will then get soaked with batter, soften up and holes will form in the sides further allowing more batter to pour out.  It's not pretty.  At all.

It was so distressing that I forgot to photograph the massive oven disaster.  I was too busy in how-can-I-fix-this mode.

So how did I fix it?  I removed all of the cones and placed them upright in a high-sided baking pan.  I topped off the batter with my extra (thank goodness for the double batter recipe!), and then placed them back into over at 350F.  The majority were still a little lop-sided, prone to leaking or a little crusty, but overall they TASTED fine. Right?  And I could cover up the tops with the delicious frosting.
Banana Ice Cream Cone Cupcakes


Lesson?  Well, this is amazing cake.  This is amazing cream cheese frosting.  This should not be wasted in a styrofoamy ice cream cone.  Just bake the cake by itself.  And if you want to do the cone thing, use a half dozen loaf pans that will hold 3 cones each.  It's tedious, but if you have a giant oven, lots of time, or just stick with the traditional box mix cake, you should be fine.

Banana Cake in Ice Cream Cones with Cream Cheese Frosting
Recipe circulating the web a million times over with one source at allrecipes.com


Batter (this makes twice as much batter as you need for 24 cones, so plan on make a little loaf too):
3 bananas, mashed, ripe
2 teaspoons lemon juice
3 cups flour
1 1/2 teaspoons baking soda
1/4 teaspoon salt
3/4 cup butter, softened
2 1/8 cups sugar
3 large eggs
2 teaspoons vanilla
1 1/2 cups buttermilk

Frosting:
1/2 cup butter, softened
1 (8 ounce) package cream cheese, softened
1 teaspoon vanilla
2 cups confectioners’ sugar
**
cinnamon & sugar, for dusting

Directions:

1. Preheat oven to 250°.
2. In a small bowl, mix mashed banana with the lemon juice; set aside.
3. In a medium bowl, mix flour, baking soda and salt; set aside.
4. In a large bowl, cream 3/4 cup butter and 2 1/8 cups sugar until light and fluffy. Beat in eggs, one at a time, then stir in 2 tsp vanilla.
5. Beat in the flour mixture alternately with the buttermilk. Stir in banana mixture.

Butter and sugar whiskedEggs and vanilla addedFlour and buttermilk added
6. In a 9 x 13" baking pan, place as many upright ice cream cones in the pan as possible.  Pour batter into  each of the ice cream cone cups to apprximately 1/2 inch from the top of the cone.  There will be approximately 1/2 of the batter left after 18 cones.  Save it or pour it into a loaf pan for a cake on the side.
7. Bake in preheated oven for one hour or until toothpick inserted in center comes out clean. Remove from oven.
8. For the frosting, in an electric mixer with a whisk attachment, cream the butter and cream cheese until smooth. Beat in 1 teaspoon vanilla. Add confectioners' sugar and beat on low speed until combined, then on high speed until frosting is smooth.
9. Scoop the frosting into a pastry bag without a tip, just the plastic tip-attachment piece (or a wide open round tip), and create soft serve-like swirls on top of your cake-cones.  Dust with cinnamon sugar (or I used the cinnamon dolce topping from Starbucks).


Banana Ice Cream Cone Cupcakes

February 18, 2012

Fluffy Coconut Cheesecake


Triple Coconut Cheesecake

You're probably beginning to get the idea that I do 85% of my baking for work.  You'd be right.  There are about 18 coworkers that I actively and daily interact with, each of whom has a birthday.  As a result, every few weeks I have a reason to whip up something sweet and get immediately feedback from a captive audience.

This week my co-worker Mitchell had a birthday.  He loves coconut.  Last year, I made him these jazzy super-duper coconut cupcakes.  They were actually coconut-ized box yellow cupcakes.  I like to think that I took the box to a new level.  If you know anything about my history with cake, it's that I'm actually pretty terrible at making it from scratch. It's a bit like rice.  I can't for the life of me make proper rice.  Something always goes wrong - too hard, too soft.  With cake, it's too dry or too dense.

So this year when I asked Mitchell what he wanted for a cake, he said again: Coconut.  I had free reign.  Having not make cheesecake in some time (and my fridge had three bars of malingering cream cheese), I thought 'Perfect!'  And I found the perfect recipe.

Now I found the cheesecake on The Novice Chef, but the recipe itself was written by a guest blogger from food + words.  Everything positive that was said about this cheesecake is absolutely true.  And I only changed a couple things based upon the ingredients in my house (per usual).  To quote agnes in Despicable Me: 'It's so fluffy!' So let's just to it!

As a brief overview of my changes:
  1. I love to make my cheesecake crusts with crushed pretzels, since it's super absorbent and makes this unique sweet + salty flavor.  So I subbed pretzels for the graham crackers.
  2. I doubled the whipped cream topping recipe because frankly, with the amount in that recipe, even using my KitchenAid, it went to only 1/2 the height of the towering masterpiece on The Novice Chef blog.  You definitely want twice as much fresh whipped cream, trust me
  3. Triple Coconut Cheesecake: UntoppedTriple Coconut Cheesecake: Too shortTriple Coconut Cheesecake: Final
  4. I also scooped the coconut cream off the top of the coconut milk to set aside for use in the whipped cream.  This thick cream is frequently used as a dairy-free substitute for whipped cream.  So really, this makes sense.
  5. I really want to emphasize temperature when it comes to cheesecake.  Make sure your ingredients are at room temperature, whether its the softened cream cheesecake, butter or the eggs.
  6. I have never once used a water bath, and I've made cheesecake in a wide variety of ovens, so I just skipped out on that step and my cake didn't crack.  So, not a big deal if you don't want to use a water bath, in my opinion.

Triple Coconut Cheesecake
Adapted from The Novice Chef with guest blogger from food + words.

Ingredients:

For the crust:
1 cups of crushed pretzels (food processor!)
1/2 cup granulated sugar
1 teaspoon of cinnamon
1/2 cup shredded sweetened coconut
5 tablespoons unsalted butter, melted

For the filling:
24 oz cream cheese, softened
1 cup granulated sugar
1 tablespoon cornstarch
1 teaspoon vanilla extract
1/4 teaspoon kosher salt
3 large eggs, at room temperature
7 ounces coconut milk, separate from the thick cream on top and just use the milky part
1/2 teaspoon coconut extract

For the coconut whipped cream:
2 cups heavy whipping cream
1/2 cup confectioners’ sugar
1 cup of the thick cream off the top of the coconut milk
1/2 teaspoon coconut extract
1/2 cup toasted coconut, for topping

Directions:

  1. Preheat the oven to 350 degrees F.
  2. In a bowl, combine pretzel crumbs, granulated sugar, cinnamon and shredded coconut and stir until evenly mixed. Next, pour in the melted butter and mix until the dry ingredients are saturated.
  3. Dump the crust mix into a springform pan and then press it against the bottom and sides until it create an even layer throughout. It might be a little crumbly, but just make sure there are no blatant gaps.
  4. Pretzel Crust
  5. Bake for 10-12 minutes. Remove from oven and allow to cool. Reduce the oven temperature to 325 degrees F.
  6. Using an electric mixer, use a paddle attachment to whip the cream cheese until light and aerated. Add the granulated sugar, cornstarch, vanilla extract and salt. Beat until smooth and combined. While still mixing, add one egg at a time. Add the coconut milk and extract and beat until combined.
  7. Cheesecake batter
  8. Pour the filling into the cooled pretzel crust, and place it on a baking sheet (to catch spills) in the oven.  Bake for an hour or until the filling is set and golden at the edges.  Remove and allow to cool.
  9. While your cheesecake is cooling, or the next morning, prepare the coconut whipped frosting.  In your electric mixer, add heavy whipping cream, coconut cream (reserve from before!), coconut extract and confectioners’ sugar. Whisk until stiff peaks have formed.  Spread a thick layer on top of the cheesecake, and top with the toasted coconut flakes.  Keep chilled in the refrigerator until ready to serve.
  10. Whipped coconut topping

November 1, 2011

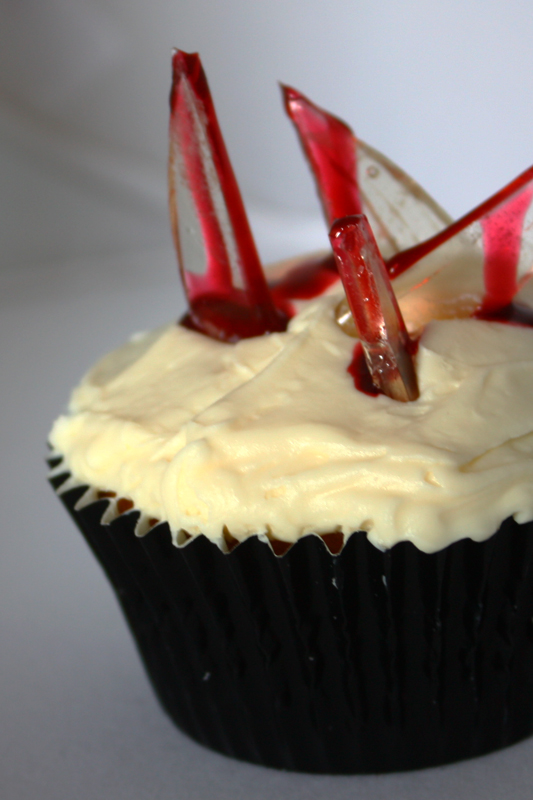
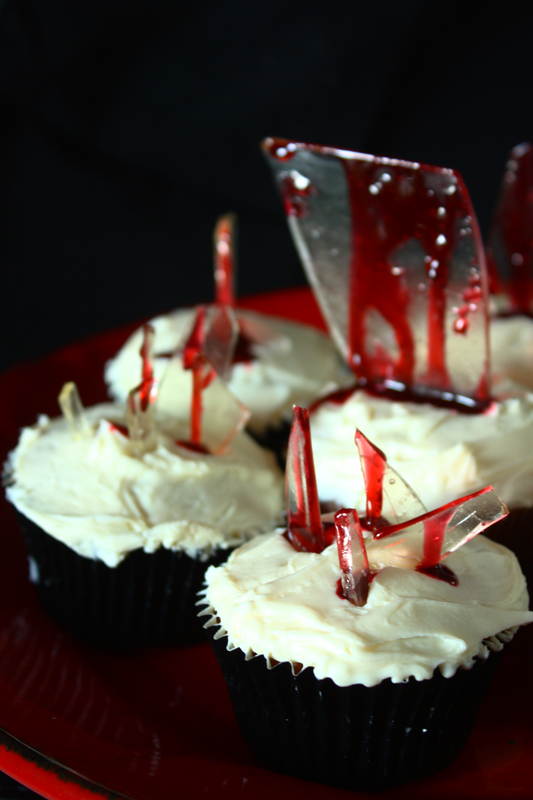
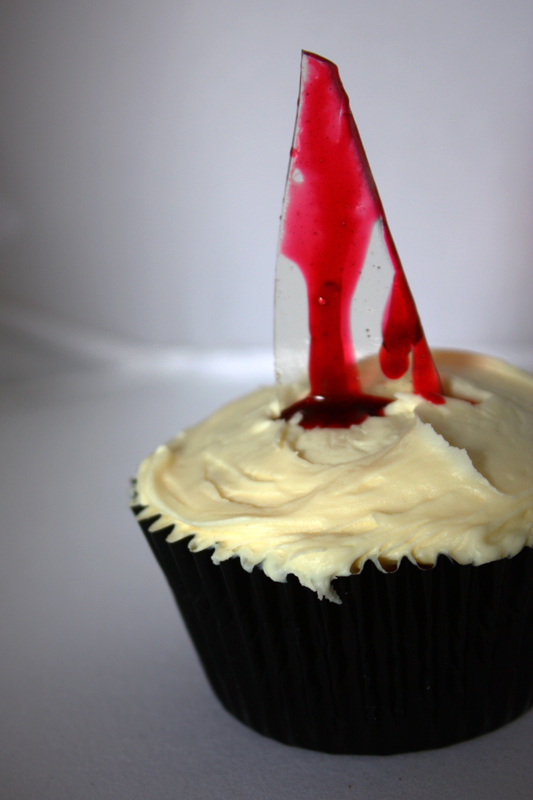
Bloody Broken Glass Cupcakes


Bloody Shattered Glass Cupcake
Bloody Broken Glass Cupcake

Halloween is my favorite holiday of all time.  I actually think that it should be a national holiday that gives people that day off from work.  That way we can spend our day putting on costumes and hosting lengthy themed parties.  Parents will easily be able to take their kids trick or treating mid-day rather than rush home after work.  We get time off for religious observances, right?  Can Halloween be my religion?

This year I decided that I was stepping my Halloween cupcakes up a notch.  I always stick with cupcakes, since they're easy to grab at parties.  There can be individuality to each cupcake as well.  Usually I do frosting-and-candy based monsters and creepy creatures.  But this year, I came across a pin on pinterest that took my breath away.  Bloody shattered glass stabbing into a perfectly pristine white cupcake.  Gruesome.

Not only do they look impressive, but easy on an effort scale.  I mean, individual monsters actually cost me more time than bringing sugar to the hard crack stage, and whipping up a batch of syrupy blood.

I consulted multiple sources for the concoction of realistic looking blood and the easiest, clearest sugar glass recipe.  In the end, I adapted a Martha sugar glass recipe for similar cupcakes and followed a great tutorial on edible fake blood from the Clockwork Lemon blog.

Bloody Broken Glass Cupcakes  
Bloody Broken Glass Cupcakes

Classic buttercream topped vanilla cupcakes

This is all up to you. Homemade, box, whatever. Just put together your classic white cupcakes. White so that the blood shows in stark contrast. I also recommend picking up some black cupcake liners, or thick premium white liners. The regular store bought white liners tend to discolor with the cupcake.

Bloody Broken Glass Cupcakes

Sugar Glass
1 cup sugar
3/4 cup water
1/4 cup corn syrup

For the sugar glass, combine all of the ingredients in a saucepan set to medium-high and clip your candy thermometer onto the side. Bring the mixture to a boil, drop the stove temperature down to medium and simply stir. And stir. And stir. Seriously, stir for like 45 minutes until the water evaporates off and your thermometer reaches 350F. Once your sugar reaches temperature, remove it immediately from the heat and pour it in a thin layer into a greased baking metal baking pan. I used butter to grease mine with, which was a poor plan. It turns your glass yellowish. So make sure to use something clear like shortening to avoid yellow swirls and cloudiness in your sugar glass. Allow to set until hard. Twist the pan to pop out the sugar glass and crack as desired.

Edible Fake Blood
1/4 cup corn syrup
Wiltons no-taste red gel dye
Wiltons black gel dye
Hot cocoa powder

Bloody Broken Glass Cupcakes


You don't really need much of this, so my recipe creates only a small amount of this fake blood. I found that the Wilton gel dyes created a much stronger color. Make sure to mix the dyes and syrup in Pyrex or other glass because it will otherwise stain plastics. I used the tiniest dot of black (it goes a looooong way) and quite a bit of red. Experiment. You can use the cocoa powder to create opacity in the blood. Just make sure to mix well so that it doesn't look gritty.

The final product can be styled in a most gruesome fashion to wow all of your friends and coworkers!

Bloody Broken Glass Cupcakes Bloody Broken Glass Cupcakes Bloody Broken Glass Cupcakes
Related Posts Plugin for WordPress, Blogger...